Build a house
# Some commands for better formatting in the website, no need to look at this
from IPython.display import Image
from IPython.core.display import display, HTML
display(HTML("<style>.container { width:100% !important; }</style>"))
Build a house
After completing the Hello world! and Turn blocks into diamond examples which introduce the basics, such as printing to the chat window and interacting with the blocks in your Minecraft world, we're going to look at a more advanced example which will build a house with one click. No need to collect materials and place the blocks one by one, just one click to instantly build a house!
To connect and interact with Minecraft we will use the mcpi library, so make use the mcpi folder you downloaded from RaspberryJam Mod's website is present in the same directory as this notebook. As an example, let's say you have the following folders:
- Desktop
- My Scripts
- mcpi
- House.ipynb <---- this notebook!
- My Scripts
Let's start coding!
1. Get Minecraft ready
It is a good idea to tell Minecraft not to go into Settings Menu when you switch to another window, for example this browser, using maybe alt+tab. To do so, go to your Minecraft installation folder and edit the options.txt file.
Find the pauseOnLostFocus value and replace true by false. Now your Minecraft game won't go into Settings Menu when you are writing your code here, and you can see everything in real time!
Now open your Minecraft game with RaspberryJam and PythonTool mods loaded, and load your favourite world, both creative or survival modes work great!
2. Load the required libraries
We have to tell Python which libraries we're going to use, so that it can import them.
import mcpi.minecraft as minecraft
import mcpi.block as block
If executing the previous cell gives you errors, it means that the mcpi folder is not in the same directory as this notebook, so Python cannot find it! Make sure you've placed it there.
3. Establish a connection to your loaded Minecraft world
Now that your world is up and running, and you have the mcpi library loaded in Python, we can make a connection to your game!
mc = minecraft.Minecraft.create()
When you execute the previous cell, it should connect without any complains or output. If an error is thrown, check that your Minecraft game has RaspberryJam and PythonTool mods loaded, and that you have opened a world.
4. Find your player's position in the world
We will obtain the player's coordinates:
position = mc.player.getPos()
print(position)
So my player is standing at position
- x = -21.521329516654646
- y = 6.0
- z = 41.48384559579614
Your coordinates will vary, as your player is standing in a different place in a completely different world!
The purpose of obtaining the player's position is to be able to build the house nearby, say a few blocks away.
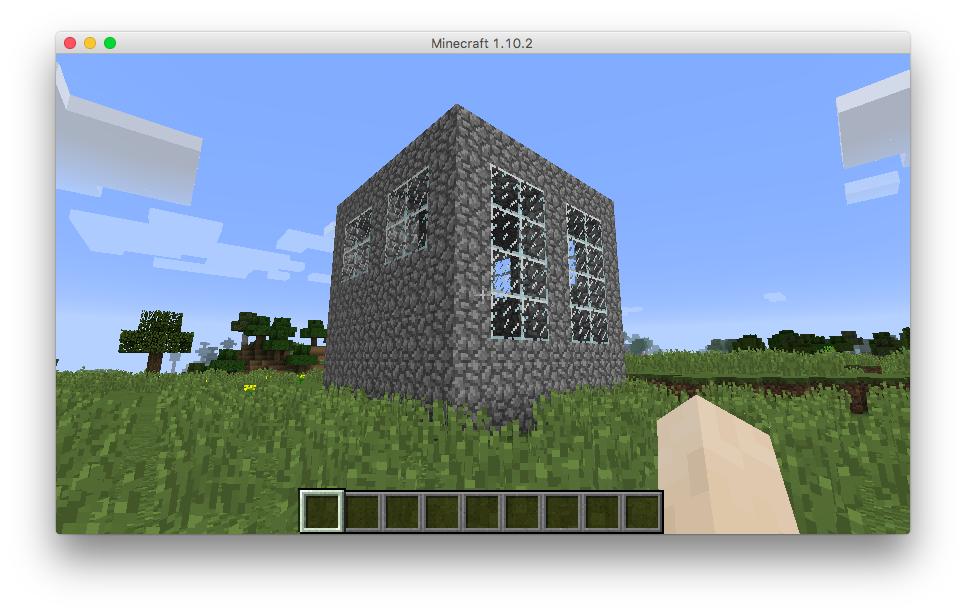
5. Create an empty room out of cobblestone
Just shift the player's coordinates a few blocks in the x and z directions. y direction is left untouched as it controls the height, and we want the house to be standing in the same ground as the player.
housePosition = position
housePosition.x = housePosition.x + 5
housePosition.z = housePosition.z + 5
A clever trick to build an empty room is the following: create a solid cube of Cobblestone (for example) of dimensions 7x7x7
mc.setBlocks(housePosition.x, housePosition.y, housePosition.z,
             housePosition.x + 6, housePosition.y + 6, housePosition.z + 6,
             block.COBBLESTONE)
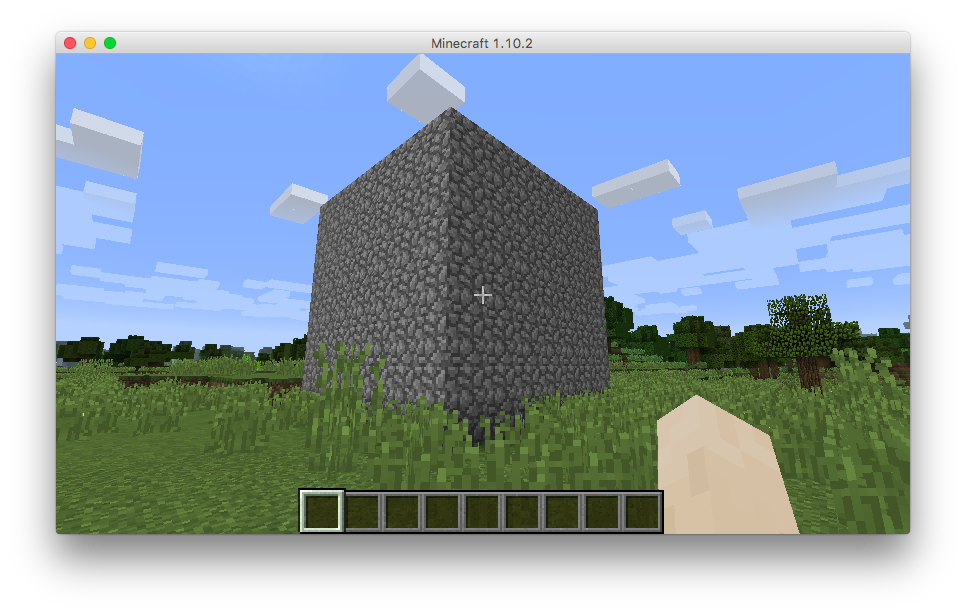
and then create a solid cube of Air inside the previous Cobblestone cube, 2 blocks smaller per side!
In this case a 6x6x6 cube. Be careful with the coordinates!
mc.setBlocks(housePosition.x + 1, housePosition.y    , housePosition.z + 1,
             housePosition.x + 5, housePosition.y + 5, housePosition.z + 5,
             block.AIR)
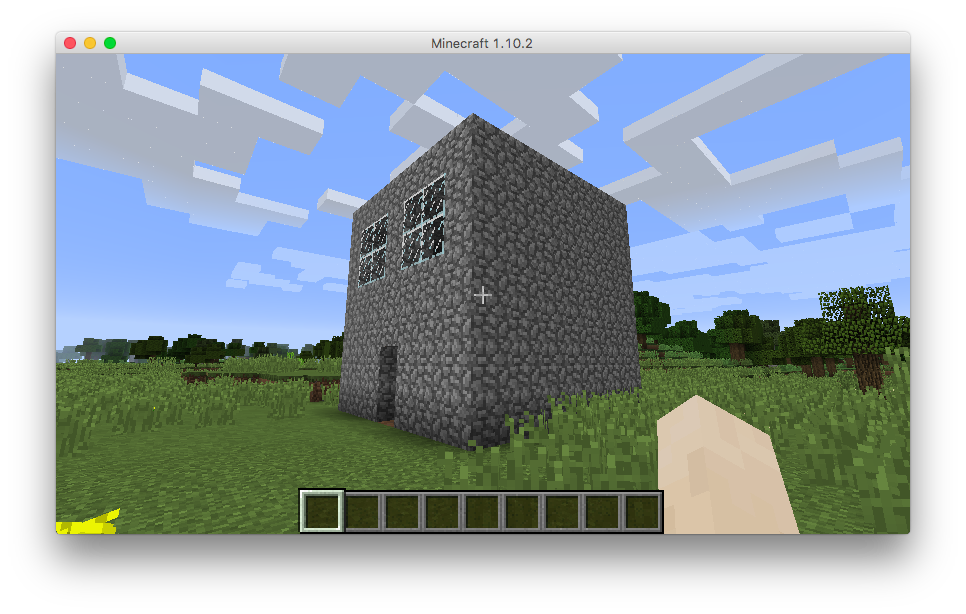
6. The house could do with some windows, and a doorway!
Have a look at the following picture which contains the schematic dimensions of the house:
TODO
The windows will just be blocks of glass:
mc.setBlock(housePosition.x + 1, housePosition.y + 5, housePosition.z, block.GLASS)
mc.setBlock(housePosition.x + 1, housePosition.y + 4, housePosition.z, block.GLASS)
mc.setBlock(housePosition.x + 2, housePosition.y + 5, housePosition.z, block.GLASS)
mc.setBlock(housePosition.x + 2, housePosition.y + 4, housePosition.z, block.GLASS)
mc.setBlock(housePosition.x + 4, housePosition.y + 5, housePosition.z, block.GLASS)
mc.setBlock(housePosition.x + 4, housePosition.y + 4, housePosition.z, block.GLASS)
mc.setBlock(housePosition.x + 5, housePosition.y + 5, housePosition.z, block.GLASS)
mc.setBlock(housePosition.x + 5, housePosition.y + 4, housePosition.z, block.GLASS)
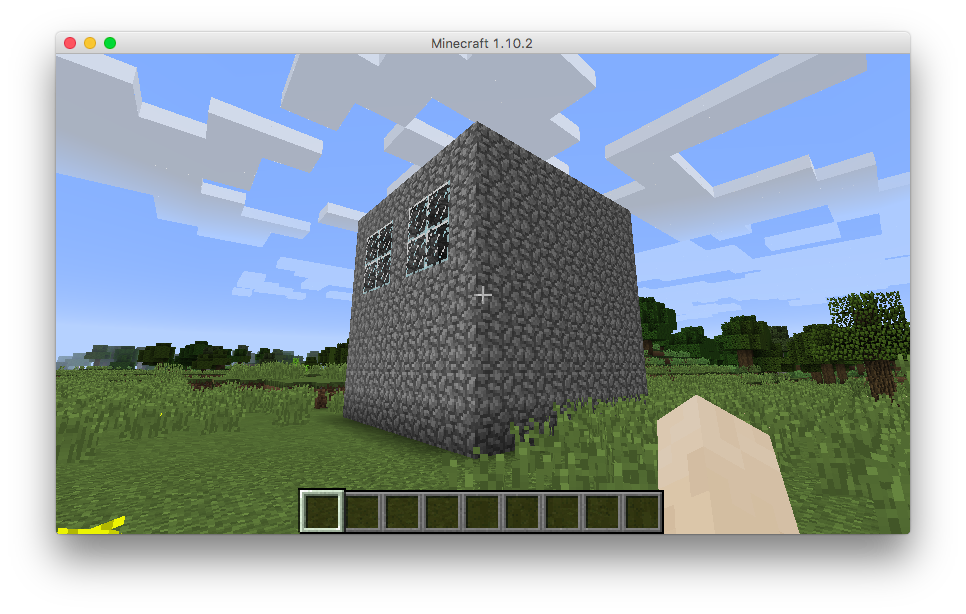
And for the doorway, we just need to place a couple of Air blocks in the middle of the wall
mc.setBlock(housePosition.x + 3, housePosition.y + 0, housePosition.z , block.AIR)
mc.setBlock(housePosition.x + 3, housePosition.y + 1, housePosition.z , block.AIR)
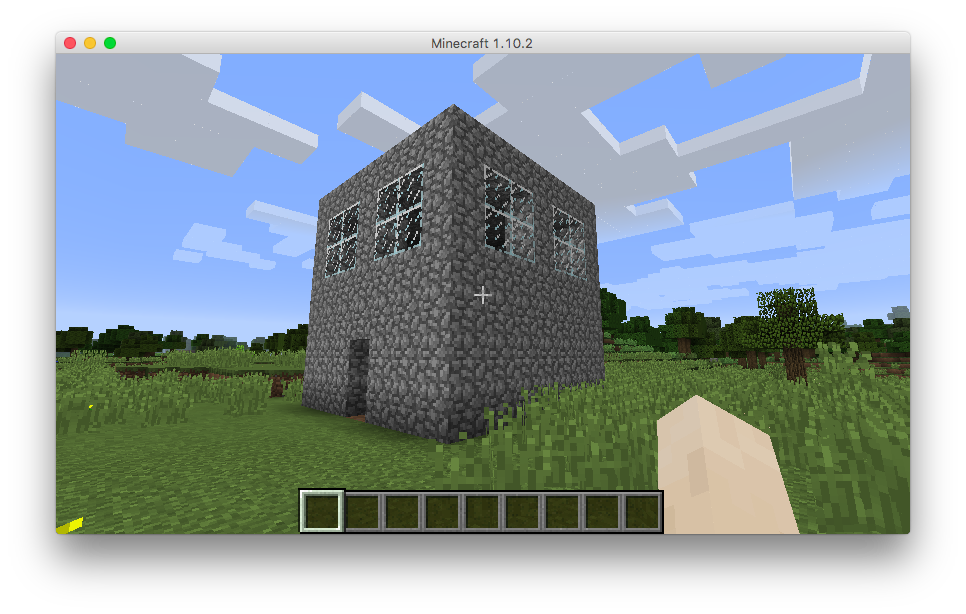
7. More improvements!
The house is pretty dark, as there are only a couple of windows. We can add as many as we want!
# Another side of the house
mc.setBlock(housePosition.x, housePosition.y + 5, housePosition.z + 1, block.GLASS)
mc.setBlock(housePosition.x, housePosition.y + 4, housePosition.z + 1, block.GLASS)
mc.setBlock(housePosition.x, housePosition.y + 5, housePosition.z + 2, block.GLASS)
mc.setBlock(housePosition.x, housePosition.y + 4, housePosition.z + 2, block.GLASS)
mc.setBlock(housePosition.x, housePosition.y + 5, housePosition.z + 4, block.GLASS)
mc.setBlock(housePosition.x, housePosition.y + 4, housePosition.z + 4, block.GLASS)
mc.setBlock(housePosition.x, housePosition.y + 5, housePosition.z + 5, block.GLASS)
mc.setBlock(housePosition.x, housePosition.y + 4, housePosition.z + 5, block.GLASS)

# Another side of the house
mc.setBlock(housePosition.x + 6, housePosition.y + 5, housePosition.z + 1, block.GLASS)
mc.setBlock(housePosition.x + 6, housePosition.y + 4, housePosition.z + 1, block.GLASS)
mc.setBlock(housePosition.x + 6, housePosition.y + 5, housePosition.z + 2, block.GLASS)
mc.setBlock(housePosition.x + 6, housePosition.y + 4, housePosition.z + 2, block.GLASS)
mc.setBlock(housePosition.x + 6, housePosition.y + 5, housePosition.z + 4, block.GLASS)
mc.setBlock(housePosition.x + 6, housePosition.y + 4, housePosition.z + 4, block.GLASS)
mc.setBlock(housePosition.x + 6, housePosition.y + 5, housePosition.z + 5, block.GLASS)
mc.setBlock(housePosition.x + 6, housePosition.y + 4, housePosition.z + 5, block.GLASS)

# Very large windows on the last side!
mc.setBlock(housePosition.x + 1, housePosition.y + 5, housePosition.z + 6, block.GLASS)
mc.setBlock(housePosition.x + 1, housePosition.y + 4, housePosition.z + 6, block.GLASS)
mc.setBlock(housePosition.x + 1, housePosition.y + 3, housePosition.z + 6, block.GLASS)
mc.setBlock(housePosition.x + 1, housePosition.y + 2, housePosition.z + 6, block.GLASS)
mc.setBlock(housePosition.x + 2, housePosition.y + 5, housePosition.z + 6, block.GLASS)
mc.setBlock(housePosition.x + 2, housePosition.y + 4, housePosition.z + 6, block.GLASS)
mc.setBlock(housePosition.x + 2, housePosition.y + 3, housePosition.z + 6, block.GLASS)
mc.setBlock(housePosition.x + 2, housePosition.y + 2, housePosition.z + 6, block.GLASS)
mc.setBlock(housePosition.x + 4, housePosition.y + 5, housePosition.z + 6, block.GLASS)
mc.setBlock(housePosition.x + 4, housePosition.y + 4, housePosition.z + 6, block.GLASS)
mc.setBlock(housePosition.x + 4, housePosition.y + 3, housePosition.z + 6, block.GLASS)
mc.setBlock(housePosition.x + 4, housePosition.y + 2, housePosition.z + 6, block.GLASS)
mc.setBlock(housePosition.x + 5, housePosition.y + 5, housePosition.z + 6, block.GLASS)
mc.setBlock(housePosition.x + 5, housePosition.y + 4, housePosition.z + 6, block.GLASS)
mc.setBlock(housePosition.x + 5, housePosition.y + 3, housePosition.z + 6, block.GLASS)
mc.setBlock(housePosition.x + 5, housePosition.y + 2, housePosition.z + 6, block.GLASS)
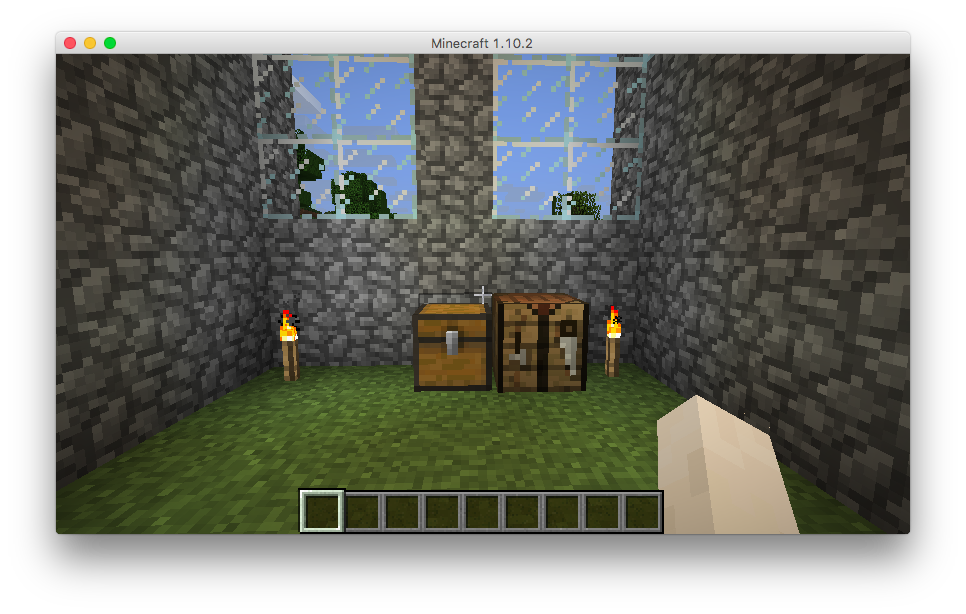
It would be nice to fill the empty house with usefull stuff, like some torches, a chest and a crafting table!
This can be accomplished using the same command setBlock, and specifying the desired position for each of them inside the house:
# First one torch at each corner
mc.setBlock(housePosition.x + 1, housePosition.y , housePosition.z + 1, block.TORCH)
mc.setBlock(housePosition.x + 1, housePosition.y , housePosition.z + 5, block.TORCH)
mc.setBlock(housePosition.x + 5, housePosition.y , housePosition.z + 1, block.TORCH)
mc.setBlock(housePosition.x + 5, housePosition.y , housePosition.z + 5, block.TORCH)

# A chest and a crafting table
mc.setBlock(housePosition.x + 2, housePosition.y , housePosition.z + 5, block.CRAFTING_TABLE)
mc.setBlock(housePosition.x + 3, housePosition.y , housePosition.z + 5, block.CHEST)
Exporting all this code as a Python script to use with PythonTool-Mod
The Jupyter Notebook is a great way to test and explore the possibilities Python offers to make Minecraft even cooler, but once you have your code ready and working, you'll want to put it together as a standard Python script so that you can use it in-game with PythonTool-Mod.
Luckily, this is very easy! Just click on File, then Download as and select Python (.py).
It will download your Python script to your Donwloads folder, as with any other file downloaded form the Internet. Just move this file to your script folder and you will find it inside the Computer Block in Minecraft, ready to be executed with one click!